Showing posts with label Spring A&S Faire. Show all posts

Tuesday, May 16, 2017

Vitreous Paint Experiments (Malachite)

I bought a small bag of malachite chips to grind into pigment, to go into the William/Isolde scribal gift box. As I was having fun smashing it, it occurred to me that we do have greenish pigments, and I wondered if malachite might not compose one.

So, I smashed it and smashed it until I got cramping fingers and crossed eyes (Actually, not that long or difficult). I got out my handy 325 mesh sifter, as in theory that's the level Reusche grinds to, and sifted the malachite until I had a handy stash in an old spice bottle.


Because I am for scientific experimentation, I wanted to control everything except one variable. I used some Reusche clear glaze base so I could see what the malachite would do on it's own. I realize, I don't know the ratio of glass (or glass components) to oxides in pigments; One period text would say 2 parts glass to one part copper. I made four test chips to compare different ratios, 1:1 through 1:4.


I mixed them on an ad hoc glass palette with a muller. The muller, being glass, seemed the easiest to clean. I noticed how easily the pigment mixed, much like working with commercial (Reusche, Fusemaster, etc) paints and stains. The very fine mesh size seems to promote fluidity. I used a bit more water than I would for "real" but with this small quantity of paint it was rather difficult to get the right water content (I guess I could have tried to drip it off an eyelash or a cat's whisker, but neither myself nor Zod were willing to cooperate with that). The water won't change the performance of the paint, only how it handles on the brush, so having too much water shouldn't impact the results.


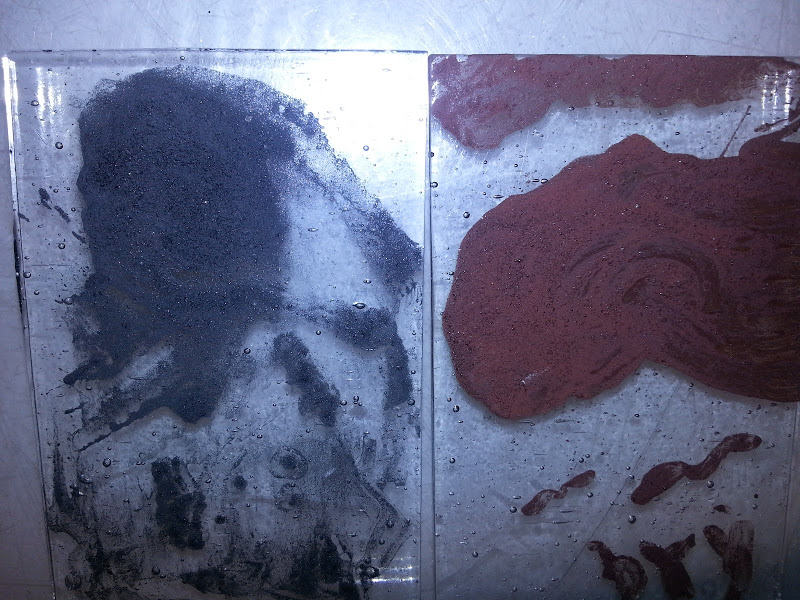
I weighed them on my mini digital scale to get the ratios. Although it does .1g increments, the floor seems to be .2 grams. That was what I used as a "unit", so the 1:1 chip is .2 grams of malachite to .2 grams of clear base. The 1:4 is .2 grams of clear base, and .8 grams of malachite. I wrote my name on the chips, for some reason the first thing that entered my head, to test the line work. I then smeared paint on the bottom block of each chip to show various values. I also marked the ratio at the top.

I then fired the chips on my standard vitreous paint schedule, which matches the range for the clear glaze base. The next morning I was fascinated to see significant change in pigment. What I was aiming for was something akin to "Grey green" pigment, a modern sample of which is here placed next to the chips:


The malachite DEFINITELY darkened. To my eye, it also seems more faintly blue than green. Azurite, a deep blue twin of malachite (both are copper (II) carbonate rocks) will turn into malachite when weathered, but nothing in my research shows the reverse. I did find that azurite when heated turns into copper (II) oxide, a black powder. That oxide is then used as a ceramic pigment, making blue as well as green, black, pink, red, and gray colors. I suspect that's what has come into play here, the malachite likely also forms the oxide which would account for the blueish hint and the darker color. I am not a chemist, however, and I couldn't easily find a reference to what happens when you heat malachite. [Edit: A friend reposted my link to get the attention of some chemistry-buff friends, and one Liz pointed me at this link. Malachite does turn into copper (II) oxide.]


I first picked up the 1:4 chip, and immediately noticed the paint flaking off onto my fingers. My fingertips were tinged grey/black/blue. I found, using a wooden skewer, that the 1:3 chip was also very easy to scratch paint from. The 1:2 I could leave some trace, but not much. The 1:1 completely resisted the stick like Reusche paints would. Looking at the reflected light, the 1:1 chip also looked much like a dozen other test chips I've made; the paint is completely glassy and adhered to the test chip. I fire my vitreous paints to the high end for that effect, so this is expected. The other three showed a rough, grainy texture I associate with previous experiments that had too rough an oxide.


Lessons Learned:

  • Yes, a randomly selected mineral MIGHT make a usable vitreous paint!
  • Something near a 1:1 ratio is probably idea to bind the pigment to the glass, though 1:2 was also serviceable. My tests of the period formulas are 1:2, and were very similar.
  • It would be wonderful to find out what actually goes into Clear Glaze. My normal secret trick is to check the EU vendors, who seem to list MSDS's that US vendors do not. Unfortunately Peli doesn't include one for Clear Glaze. Reusche gives them out if you make a special request in writing, whereas Peli just has them on their website. I rather suspect this is because the MSDS sheets rather give away the secrets. 


Monday, February 15, 2016

Period Vitreous Paints, pt 1: Oops, this worked?

"...using for this ground scales of iron and of another rust found in iron pits, which is red, or else hard red haematitefinely ground, and with these pigments he shades the flesh, using alternately black and red, according to need." - Vasari (Dover translation p. 269)

"...and he gives you a color which he makes from well-ground copper filings;" -Cennini (Dover translation p. 111)

"Take copper that has been beaten thin and burn it in a small iron pan, until it has all fallen into a powder. Then take pieces of green glass and Byzantine blue glass and grind them separately between porphyry stones. Mix these three together in such a waythat there is one third of [copper] powder, one third of green, and one third of blue. Then grind them on the same stone very carefully with wine or urine, put them in an iron or lead pot, and with the greatest care paint the glass following the lines on the board." - Theophilus (Dover translation, p, 63)

Since I've made all but one of the period silver stain formulas I have found, I've decided to try and make vitreous paint. I started by building a frit smasher; it's not the period way to grind glass but it is infinitely easier for some initial tests.

Vasari seems to suggest you just paint with metal dust. Cennini is less specific, but doesn't contradict that. Theophilus clarifies a mixture of metal filings and glass, one part to two..

Just as with my silver stain tests, where I started off with purchased silver salts, I used my frit smasher (aka a frit piston) to smash pieces of scrap clear glass from my scrap buckets. I originally thought that this would require making paints from the same glass you are going to paint on, but nothing in the primary sources suggests that. I've seen reference that say modern vitreous paints are more "glass fluxes" and oxides, rather than actual glass; the latter would seem to be more akin to an enamel as we define it modernly. In this case I specifically sought out pieces from at least two different original sheets to avoid accidentally lining up CoEs.

Scrap glass pieces. I ended up using about twice this. My left hand for scale.

After just a few minutes work, with occasionally shaking of the pile to mix it up for better smashing

For those who don't do much with warm or hot glass, the Coefficient of Expansion relates to how quickly the warming or cooling glass expands or contracts. If you try to use two pieces of glass with incompatible CoEs, they will separate, usually fatally and sometimes explosively. I've generally seen a safe range being only one point in either direction (the common CoEs are 90 and 96 for fusible glass, with 103 also being common to lampworkers making beads. Borosilicate glass/Pyrex used by some lampworkers is CoE 33.) The bulbs I use for my ornaments class are COE 89; we use CoE 90 frit with them with no problem, but 96 is right out.

I rather expected the CoE would be a problem, and would spall or destroy the test chip. I used my frit smasher and generated a mess of pebbles and dust. Lacking anything more specific for filtering, I rolled the material in a piece of cheesecloth to get a grainy powder into a bowl.

Do not inhale this!

I ended up with a wooden bowl of rough clear glass powder. I turned to two purchased bags of metal filings, one iron and one copper. Bother are already a very very fine powder. I scooped a little of each into small wooden bowls using a palette knife, and added a similar amount of glass powder. As I stirred I worried there wouldn't be enough glass to "bind" the metal, and I added more of my clear powder. I ended up, accidentally, with approximately the ratio Theophilus called for. I did some cursory grinding on the palette, but it really didn't help. Testing it with a sable brush showed poor adhesion to the hairs, and the paint that left the brush was fairly poor, very weak with the copper-based batch. The iron batch was much better. As both metals are finely powdered I think I found a better portion of the powder bowl to draw from by luck.

Next go around, I will try to grind them up on porphyry, as period sources call for. I have been confused from time to time on what that means. Over Facebook THL Ian the Green gave me some clearer details from C&I pigment creation. He referenced this video, suggesting the technique at 6:29 and after 8:00 would be helpful. I will try and follow these next.

I placed them on some of my standard test chips, cut to size a binder full of test chips. Because it is glass powder and metal, I suspected that it would require a fairly high temperature to fire these paints; period sources definitely don't have the precise control we have, and in theory this strikes me as much more akin to glass fusing than normal paint firing. I used my standard cycle (which reaches 1250) and waited. And waited. And WAAAAITED.


The chips actually worked quite well. They didn't fire to the smooth and glossy shine of my modern Resuche paints, but they were opaque and well-adhered. I suspected, still, that they would be poorly fixed so I took the chips to my lightbox and hit them with a skewer I use for cleanup work. None of it scratched off.

The iron chip is "psychologically black" rather than optically black; When you see it, you know it's black. Your brain would remember it as black. It's actually fairly grey. The copper based pigment is a pretty color, but I would best describe it as somewhat like dried blood; It's lighter than bistre brown (which reminds me of old tree bark, it's a very dark color but not enough to be perceived as black) and it's a bit darker and more true than tracing brown, which to me has a reddish hint.

Overall, it was incredibly exciting to get working results with these very first attempts. I'm going to pursue more period steps immediately.

As an afterthought, I want to document something Master Avery shared on Facebook. I was totally unaware that you can reverse rust back into iron. The physical structure is destroyed, but the iron is recoverable. This is one way to get good, fine, filings; By using an oxidizer (and I will edit in what he offered, bleach I think) you can get the iron to rust. Then you can easily grind the rust. Putting it in charcoal and heating it appropriately will reverse the oxidation and leave iron. Very, very neat.


Lessons Learned/New Questions:
Holy cow, this worked.
It would work better if ground up more finely
     Use commercial powder/better sieved home made powder?
     Try the porphyry method
Does da Pisa have a recipe? Mappae Clavicula? The Bolognese manuscript? Have to check them...
I did very tiny batches, next time use my sandblasting mask to avoid any invisible dust inhalation.
How is color modulated? How is my modern tracing black so much darker? More iron? Or a darker mineral?
What will hematite look like? Pinkish, for sure, but...
What is Byzantine blue glass? A color, or a specific formula of glass? Byzantium is a purple...

Monday, April 21, 2014

A&S Day... something: Casting Cames

My last planned obstacle: casting lead cames to use. I've been trying to get a mold to work for a while now. Soapstone would be much easier, I think, but the documentation I have is after the period of my panel. The documentation I have from before it says the molds should be either iron or wood. There is no way I can forge an iron came mold, so wood it is.

A quick note on terminology, as I was taught and use. The two broader surfaces of the came's "H" that are visible are leaves. The lead portion connecting them, which is directly between the pieces of class and cannot be seen, is the heart. 

A less quick note on safety: Lead (and other heavy-metal) poisoning almost always happens because of ingestion, not inhalation. If you get a whiff of fumes while soldering and it irritates your nose or gives you a headache, it's because of the flux compounds (which generally are not serious, but check the MSDS for your flux). Think of lead like water. If you have a cup of water, is it billowing steam in your face? No, it's in liquid form. Even if you heat the water a bit, its warm or hot water. It is quite possible to heat lead and not generate lead fumes. If you are boiling the lead, then you have a problem! At the hottest setting of my stovetop I could barely melt the lead. Still, I ran the vent hood on high. I believe this process is very analogous to soldering (which is melting lead), and soldering is pretty safe for a hobbyist. I know professionals with decades of stained glass experience who do not have elevated blood lead levels. A little research indicates that the temperature at which lead generates fumes is 800-1000 degrees hotter than the melting temperature during casting. That being said, a hot plate outside will not do you wrong, either. Remember that any tool or container you use for working with lead is contaminated and must be washed. If, like me, you use a pan on the stove do not reuse the pan for food. I highly doubt you could get it clean enough.

I started with some wooden blocks that I believe are intended as part of crown molding. At the hardware store I verified they were relatively flush when squeezed together (such as by a clamp).

At first I tried free-hand carving the grooves. That sort of worked but I realized it was going to be impossible to keep them lined up the whole length without the leaf-grooves being wider than I wanted.

Going back to primary sources provided an answer. Soaking string in paint, laying them out, and then pressing the other board onto the first. This would create two sets of lines that should line up again. I found this to be fairly difficult, however, because I was trying to keep the lines a uniform distance, and the thick yarn made a fairly imprecise line to then follow. Not to mention it rolled a bit when I was trying to line up the edges of the block too (probably unnecessary).

 This view of the clamped mold shows the difficulty I had with the period method.

I ended up using a precise rule and measuring in an inch from the edge of the block. I made a line, moved over about 3/8" and made another line. The idea was to provide a common reference point (the block edge) and, if my measurements were accurate, everything should line up.

I then used a handsaw to "connect" the lines on either end. This ended up more difficult than I initially anticipated because of the wood I used. It has a slight curve, so sawing the ends was easy but it took some patience to get the grooves in the center.

The boards after the grooves were sawn.

Another view

I had a mold for the leaves, but I needed to remove a little of the wood between the two grooves to put the heart between them. I tried several tools and didn't find an "easy" one to make this painless. First I tried wood carving chisels, which did almost nothing (they are a cheap set). Then I tried the thin edge of a large file, with minimal results. I then wrapped sandpaper around that thin edge and tried again with some progress. The only sandpaper I had available was relatively fine, however, so I think that impacted it.

Finally I used a set of smaller files, where I could use the crosscut broad surfaces, and they worked better than anything. I sat during a Blackhawks game and filed away material until I could feel a distinct difference. A bright light provided a good test as well:


When my former protege-brother (he was elevated, there was no falling out) taught me to cast with lead-free pewter, he taught me to use an electric crucible popular with sportsmen for making lead sinks. Another protege-brother had said that a cast iron skillet works just as well in a pinch. I purchased a cast iron skillet with nice little pour spouts for this purpose (If anyone comes over for breakfast I promise not to reuse it!). I placed a bit of scrap came into it and fired it up. And waited. And waited. Eventually, with the fire turned up as high as it would go without the igniter clicking, it worked.

Now, note that what I'm using for this is scrap and cast-off cames, usually heavily oxidized. The piece above was clipped from my "good" spool. Lightly oxidized, it is silver and pretty. Once I saw it would work, I threw in my much dirtier scrap pile:


As soon as I tipped the pan a little a lot of the above lead pooled together. The impurities are fairly visible and many "colors" appeared as time went on.

I couldn't take pictures of the actual pouring because at this point I required speed, accuracy, and two hands.

The top of my mold with some over-flow. It took less lead to fill it than I anticipated.

The bottom of the mold. I had set it on a block of soapstone so as to protect the surface of my stove from molten lead. 

Prying the mold halves apart was often a bit of work, and the first time it required an implement or two to assist. The results were somewhat ugly, though identifiable to me. The pictures may be hard to see because of how shiny the came was. It washed out the "depth" I think.


I immediately remelted the lead and tried again. I know that slight alignment changes can have big effects.

Much more identifiable. The heart did not fill in near the top, but there was a usable portion from this casting. I figured the mold might "burn in" a little and remelted this again.

This was my third or fourth attempt. I need to call it a night, so I've stopped here for the moment. Each casting has turned out better results than the one before it. I kept the came above, there is a section about 2" long that is usable, and I have 1" square pieces that will gladly take this piece of came! It's not much, but it's a successfully cast came from a wooden mold.


Saturday, March 29, 2014

2014 A&S Faire, "Day" 5

Well, the panel isn't going to be done in time for Midlands tomorrow. I am quite a bit saddened by that, but it's for the best. I spent 20 minutes looking for the documentation I needed for a shortcut I was going to take (and it is totally period, but it's still a shortcut) so I could save two kiln firings and try to make it happen. I decided it was best to not do it, make it the way I wanted, and HOPEFULLY send it with someone to Pentamere in a few weeks. That way I can still enter it at Kingdom.

Anyway, it's in the kiln firing right now. I've applied one layer of grey mat to the pieces, and removed the vines and ivy leaves:


After I fire them all I will repeat it with a second coating overall, so there is no clear glass and two tones of grey. I'm slightly tempted to pick out highlights again, and have three tones of grey, accept the deviation from the "co-geo-contemporaneous" panels. Three levels of shading is period, but I don't know that it was ever used for grisailles.

Using wine as a vehicle for the paint is fascinating. I am using a somewhat sweet white wine as a vintner friend suggested (specifically a moscato, very specifically the sparkling moscato from Cooper's Hawk Winery). The glass is sticky as a result. The paint is hard to scrub out; I'm not certain if that is because of the wine or if I inadvertently added more gum arabic than usual. I suspect the wine because Elskus mentions using table sugar as a binder. I imagine the sweetness of the wine could be introducing the additional grip. Because it's what was more local, I'm going to try a test batch of paint with cider instead of wine, though that isn't documented in any of the period sources. It makes sense and I can imagine a Norman glazier using it happily.

In order to scrub the pieces out I'm having to dip my hog bristle scrub into wine. It's really more like I'm rewetting the paint and removing it with a paper towel most of the time, where as with water I usually brush the dry dust off. If I remember correctly vinegar is described as giving a hard protective shell to the paint that can resist water (and save on firings). This seems to have a similar effect. I'm also glad it's a little cold for bugs, yet; I think plenty of them would be interested in the sugar. At Pennsic I will likely need to paint with vinegar (citable) or forego it for water. The third documentable item in Theophilus is urine, which I don't intend to try soon.

I'm somewhat relieved that I'm missing Midlands tomorrow; as I go I discovered a few pieces that were painted incorrectly. At least one, a corner, I was talked into leaving alone. Two pieces ended up with no ivy leaves, however, and they stand out when taken as a whole. After I get the shadings done I think I will go back over some of the pieces and strengthen lines, add in missing leaves, etc.

Pieces with highlights and some without (yet). Ignore the blotchiness, it's excess paint on the "table" and not actually blotchy paint on the glass

A close up of the pieces being fired right now


Wednesday, March 26, 2014

A&S Faire Project, post 4... and porphyry!

Finished cutting the glass for my panel, got the key lines painted on as well. The first half is firing right now. Unfortunately looking at the picture I see a problem and I'll have to redo one of the pieces heh.

Showing some of the blue pieces in place

Key lines painted in

I decided to try and freehand paint it all, which is weird for me. I ALWAYS trace. It was fun.

Today I got two books in and a new sample of porphyry. Fortunately this looks like "the right stuff!"

The original pieces I bought look like they were intended for countertops or something:


The surface was completely smooth and didn't grind very well.

The new stuff is more like the color of "Imperial porphyry" and it arrived in rough chunks that do grind quite well. 

Finally....carving molds is difficult!

Monday, March 10, 2014

2014 A&S Faire: Day 2

Today I learned I was way off base about the use of the grozing iron. I'm a little embarrassed to write this, but this blog is a place for me to track my findings, sources, projects, etc. I know others read it, and I link others here when something I've found may help them... but at its core it's my own record keeping.  So, today I learned that the grozing iron is not grozing pliers in a different shape.

It wasn't just the name that led me to think this, but a slight underestimation of the tool's capabilities. I understand and understood that the dividing iron acted as a glass cutter and running pliers in one; it creates a score that runs pretty much simultaneously. I thought that the grozing iron must be there for lines that don't quite break, or for glass that is leftover on a breakline. I tested the tool that way, running a score and confirming that, yes, it breaks the score.

However, that's not what gives period glass it's distinctive chewed appearance, and not why the tool is described as nibbling glass. Tonight I cut a few pieces of my panel with the dividing iron and noticed I could only cut some general shapes out, not the exact pieces I planned. I reviewed some notes, sources, and reconstructions from a tourist attraction in the UK and suddenly it clicked.

You are literally chipping away little bits of glass with the grozing iron. It uses brute force to chew bites off the glass, a description that suddenly seems a lot more on the nose when you are looking at all these tiny semi-circles taken out of an edge. I was also surprised to find that the tool is quite versatile. I can tear off large chunks indiscriminately, and I can also scrape slivers off. 

So, today I cut most of one blue/gold border. According to the museum notes these panels were silver stained. It looks rather even and its the entire piece in all of these borders, so I assumed it would be pot metal yellow. I'm trusting the experts, however, that these were stained.

A grozed piece in place

The border, missing two pieces

The picture above shows a side effect of using a dividing iron; There is a lot of uncontrolled cutting and breakage. Unfortunately it is very difficult to get the blue GNA glass I'm using here, and the clear mouth blown is expensive. I don't think I'm going to be able to maintain my goal of extensive period cutting. I will use it whenever I can, but I'm already accepting the fact I will have to use my modern cutter in many places just to avoid wasting hundreds of dollars of glass, some of which I can't even replace if I have to.

I'm saving the little pieces on the corner of the table to potentially make a small batch of vitreous paint. I have a late period formula that calls for iron shavings, which I have on hand. It will make for a fun little experiment. I don't have to worry so much about incompatibility if I am using the same base glass... I hope!

A close up of a piece while I worked on it, showing the characteristic nibbles

All in all today I got a first true appreciation for the work of a medieval glazier. I am making a 1 square foot scaled down version of a segment that would have been 4 square feet. If I do the math, and if memory serves, the entire window would have been 36 square feet. It was one of 5 windows in that portion of the church. One of several dozen windows in that cathedral. 

And they made it with a hot iron rod and a bar with a notch in it, in essence.

Ho-ly { ..... }

The enormity of it boggles my mind. They could do so much with so little in the middle ages.


Sunday, March 9, 2014

2014 A&S Faire Project: Day 1

Now that I think I have all of my materials and tools gathered, it's time to get to work!

I will try to add notations and sources later. From my research, the glass artist worked from a "table" that was whitewashed, and the pattern drawn directly on it. There are financial records showing the glazier hiring artists to draw their pattern onto the table for them. I do have a sister-in-law who is a professional artist, but rather than bother her, I decided to trace the design I want onto the board. But, I wanted to do it in a period manner too.

The "creative" category of our faire criteria threw me for a while. Researching period practices, we can show that glaziers would reuse the same cutlines on a table for different windows. I have chosen a specific cutline from a grisaille window segment in a Norman catehdral. I'm going to paint it with a floral motif from a different contemporaneous grisaille in the same cathedral, and use a border inspired by a third. The end design should look like it could have come from the same time and place (and building!)

I started with a large board I had around the house. I white washed it and placed it on my dining table to begin working. It was inspected and improved by Scheherazade ("Zod"), my cat.


I placed my pattern onto the board, grabbed a pin from my sewing kit... and started poking it. Now, this method is not one I researched personally (my library is not focused on scribal arts) but was described to me by multiple highly-learned scribe friends. [See Lessons Learned, below, for a note on these pins!]


This was both more and less tedious than I expected. Right when I reached a point where I really thought unkind things, I also realized I was finished with the pin. It hurt my hand quite a bit, pushing that pin into wood. The thought occurred to me it might be easier to have a handmade pin like what Roana or Ercc makes. They are a bit larger and I suspect stronger. Sometimes this pin was bending more than I was comfortable with as I pushed. I imagined it snapping and going into my finger (been there, done that). Fortunately, it didn't.

The hole-y template

I then rubbed the leadlines-to-be with charcoal


As promised, the dots and charcoal were left behind on the board.


I then played connect-the dots...


The traced cutline looked a bit irregular. On further exam... the original panel was irregular. No problem there, then!

Now, I have a whitewashed board, a cutline on it, and my tools ready. I got excited, grabbed the glass, and got to work. Unfortunately, that was a mistake. The medieval procedure was to trace my desired cut line "with an emery point" before taking the dividing iron to it. I forgot that part and jumped right in with the iron. As a result, it didn't follow the path I needed. Rather than just waste the opportunity however, I grabbed my camera. Here is video I took of the dividing iron doing it's job. I did initially have to use a little bit of water to get it started, but after that it followed the heat well:

I removed the background nose of the "How It's Made" marathon and replaced it with something a little more.... on topic.

Before anyone asks, the white material on the rod is from absent-mindedly setting a blackhot iron onto the pattern table. It burned and picked up some paint.

Since I demonstrated the dividing iron on tape, I decided to do a quick video of the grozing iron too. I had a segment of glass that I scored but which was not cleanly broken. The grozing iron takes it right off.

[Edit: Movie deleted! I was an idiot! See the post that follows on Day 2, I kind of misunderstood how a grozing iron was supposed to work until I used it in production...]

I didn't have any clever music for this one, so you get 23 seconds of How It's Made.

Lessons Learned:

The wood used for the table can have an impact. This had hard bands that were difficult to push a pin into. Estelle de la Mer has informed me of a better alternative and provided a picture, of a handmade tool she uses for ruling in her scribal work:


Don't forget the emery point path! I shall find out today how different that makes the process.

As I already knew, a larger dividing iron will hold more heat and make this process easier with it's extended working time. That will be rectified later!


Making a hogs-bristle brush

I had some trouble when I tried making my first minever paint brush.

I researched it a bit more and discovered two things: The first set of quills I had purchased were mutants and had been cut short by the vendor and second, people working with quills usually soak them to make them softer.

Now, to be clear, in the directions on p. 40 of my copy of Cennini he doesn't say to soak the quills. His thread may have been stronger, his quills thinner-walled, or many other things. However it looks like fly-fishers and others using these quills today frequently soak them, so I gave that a try. That made the quills softer and suddenly able to take a bit of a "squeeze" that broke my thread with the first try. Not wanting to waste my precious supplies of stoat tails, I decided to try again using hogs-bristle (the other type of brush described by Cennini).


A feather from the first set (top) next to one from the second set. I hadn't realized the feather should have this chiseled tip the top one has. Comparatively the second set also have much more usable quill.

The process is pretty much exactly as described in the previous post. I have a pack of hog-bristle brushes that I bought for scrubs in my glass painting. I took an exceptionally large one for which I had a duplicate and took it apart to claim the bristles.

An interesting observation, the bristles have a "root" end. I'm not sure it's biolgically/cosmetically a "root" but one end will be thicker and stronger on a good bristle (I also don't know why these are bristles and not hairs, but I'm a glazier-turned-brushmaker not a biologist... yet). I found it important to try and line up the bristles so I knew which end was the thicker/stronger end.

I took my soaked quill and trimmed the very end off. I used a tapered stick "of other good wood" as Cennini calls for, and shoved the quill on as far as possible. I then grabbed a clump of bristles and shoved them in the other end. Cennini described sticking bristles/hairs in individually until you can't get any more of them. This is where it became a LOT easier to know which was the strong end, as that end wiggles in more easily.

This also makes some sense for retention purposes, I think. The portion of the bristles that is at the opening of the quill is somewhat thinner. You can sneak more bristles in. If you were to try and pull the bristles collectively, however, I think the thicker ends would jam and not come out in a clump.

I tied a knot with my waxed silk thread and could see the quill took the pressure a little better. My thread snapped, after I had gotten the knot tied. On a lark, taking a note from an old martial arts movie that "wet silk never breaks" (not true!) I soaked the thread. I continued tying another knot and doing a little wrapping (that was probably too loose). Its difficult to do all this with only two hands! Same thread, knot, wrapping on the other end to secure it to the stick.


The brush was a little wild, and as Cennini told me to, I trimmed it down a bit:


As a final step I dunked it back into water and made some practice strokes. I gently tried pulling the bristles and none came out. I wouldn't give them a serious tug, but I think this is a practical brush made exactly to the primary source's standards. We will see if it holds up to vitreous paint and silver stain, however!

When I teach my silver stain glass this Pennsic, I hope to give out small vials of stain. I'd love to make a dozen of these to give out too. It didn't take too long in the scheme of things and would be a nice touch!

Lessons Learned:

Hog bristles are much more clingy than stoat fur. When I dunked my bunches of bristles in water they immediately made a tight cluster. I had to work the fur with my fingers for a while to try and make a cohesive bundle. I think in general bristle brushes are going to be easier to make than stoat.

I'm not sure why soaking a hard protein-based quill makes it softer, but don't our fingernails do the same after a hot soak in the tub? Might be something to investigate when bored later.

I have typed and said Cennini's name so much lately I'm starting to feel bad that I have no idea how to pronounce it. Keh-nee-nee? Cheh-nee-nee? I highly doubt it's Sen-nee-nee. I'll need to figure that out before I teach and have to say it several times.