Showing posts with label enamel. Show all posts

Monday, March 27, 2017

Two Mistakes: Hamsa

I had the idea to make a Hamsa. The idea persisted, and turned into a large flop. So, I remade it. Which turned into a second flop.

Enamels are difficult.

I ended up making nearly the same design, but pieced. I was mad and determined, at that point.  I started with a design I found online; I found it on several websites, in several ways and places. I couldn't determine an original creator, etc and chalked it up to a generic cultural motif. Having learned much from Estelle's scroll, I thought I planned it well. I used the more stable blue, and skipped the idea of using silver stain.

Attempt 1, I painted on the black line work, then added a mat of blue enamel. In the past, again for one of Estelle's badges, I got a phenomenal sapphire blue right off the bat. That gave me incorrect assumptions about how easy it can be to use!

This happened over a year ago, and Facebook isn't helping me work out the order. I know at one point I discovered I had two different blues on hand, with no recollection of the opaque one. So much so that I went back and found the order and made sure I had consciously ordered it (which I had).

The next piece, I kept adding blue trying to get the Sapphire hue I wanted. After a few coats the enamel turned opaque and off-color, a grayish tone to it. I still don't know why, but I decided I needed to get it right from the start.

The next attempt, after doing the line work and the enamel I decided I wanted to shade the background and went back, to add more black mat. That tanked the whole piece as well, as shown below.


Ugly and wrong color, above!


 My "mistake" in going back to vitreous paint. Guess blue enamel isn't as stable as I thought.


A closeup of the weirdness that ensued. I suppose too many layers of enamel flattened out and blurred the black lines beneath, like layers of glass can displace one another when fusing.

The final piece I successfully made and framed, to get a Hamsa out of my mind. I've not included a picture of the pattern to retain my blog's G-rating, as each piece was named with a different profanity, instead of the customary numbers or symbols.

The bottom right corner was 'bullsh*t' if I recall. It was easy to cut, that was just it's nickname.

Lessons Learned:


  • Be sure you are using the glass paint you think you are using!
  • Blue enamels are also touchy. All enamels are semi-evil.
  • Weird things can happen if you apply them too thickly (?) or fire them too many times
  • It looks like many layers can displace one another between firings.


Monday, February 15, 2016

Period Vitreous Paints, pt 1: Oops, this worked?

"...using for this ground scales of iron and of another rust found in iron pits, which is red, or else hard red haematitefinely ground, and with these pigments he shades the flesh, using alternately black and red, according to need." - Vasari (Dover translation p. 269)

"...and he gives you a color which he makes from well-ground copper filings;" -Cennini (Dover translation p. 111)

"Take copper that has been beaten thin and burn it in a small iron pan, until it has all fallen into a powder. Then take pieces of green glass and Byzantine blue glass and grind them separately between porphyry stones. Mix these three together in such a waythat there is one third of [copper] powder, one third of green, and one third of blue. Then grind them on the same stone very carefully with wine or urine, put them in an iron or lead pot, and with the greatest care paint the glass following the lines on the board." - Theophilus (Dover translation, p, 63)

Since I've made all but one of the period silver stain formulas I have found, I've decided to try and make vitreous paint. I started by building a frit smasher; it's not the period way to grind glass but it is infinitely easier for some initial tests.

Vasari seems to suggest you just paint with metal dust. Cennini is less specific, but doesn't contradict that. Theophilus clarifies a mixture of metal filings and glass, one part to two..

Just as with my silver stain tests, where I started off with purchased silver salts, I used my frit smasher (aka a frit piston) to smash pieces of scrap clear glass from my scrap buckets. I originally thought that this would require making paints from the same glass you are going to paint on, but nothing in the primary sources suggests that. I've seen reference that say modern vitreous paints are more "glass fluxes" and oxides, rather than actual glass; the latter would seem to be more akin to an enamel as we define it modernly. In this case I specifically sought out pieces from at least two different original sheets to avoid accidentally lining up CoEs.

Scrap glass pieces. I ended up using about twice this. My left hand for scale.

After just a few minutes work, with occasionally shaking of the pile to mix it up for better smashing

For those who don't do much with warm or hot glass, the Coefficient of Expansion relates to how quickly the warming or cooling glass expands or contracts. If you try to use two pieces of glass with incompatible CoEs, they will separate, usually fatally and sometimes explosively. I've generally seen a safe range being only one point in either direction (the common CoEs are 90 and 96 for fusible glass, with 103 also being common to lampworkers making beads. Borosilicate glass/Pyrex used by some lampworkers is CoE 33.) The bulbs I use for my ornaments class are COE 89; we use CoE 90 frit with them with no problem, but 96 is right out.

I rather expected the CoE would be a problem, and would spall or destroy the test chip. I used my frit smasher and generated a mess of pebbles and dust. Lacking anything more specific for filtering, I rolled the material in a piece of cheesecloth to get a grainy powder into a bowl.

Do not inhale this!

I ended up with a wooden bowl of rough clear glass powder. I turned to two purchased bags of metal filings, one iron and one copper. Bother are already a very very fine powder. I scooped a little of each into small wooden bowls using a palette knife, and added a similar amount of glass powder. As I stirred I worried there wouldn't be enough glass to "bind" the metal, and I added more of my clear powder. I ended up, accidentally, with approximately the ratio Theophilus called for. I did some cursory grinding on the palette, but it really didn't help. Testing it with a sable brush showed poor adhesion to the hairs, and the paint that left the brush was fairly poor, very weak with the copper-based batch. The iron batch was much better. As both metals are finely powdered I think I found a better portion of the powder bowl to draw from by luck.

Next go around, I will try to grind them up on porphyry, as period sources call for. I have been confused from time to time on what that means. Over Facebook THL Ian the Green gave me some clearer details from C&I pigment creation. He referenced this video, suggesting the technique at 6:29 and after 8:00 would be helpful. I will try and follow these next.

I placed them on some of my standard test chips, cut to size a binder full of test chips. Because it is glass powder and metal, I suspected that it would require a fairly high temperature to fire these paints; period sources definitely don't have the precise control we have, and in theory this strikes me as much more akin to glass fusing than normal paint firing. I used my standard cycle (which reaches 1250) and waited. And waited. And WAAAAITED.


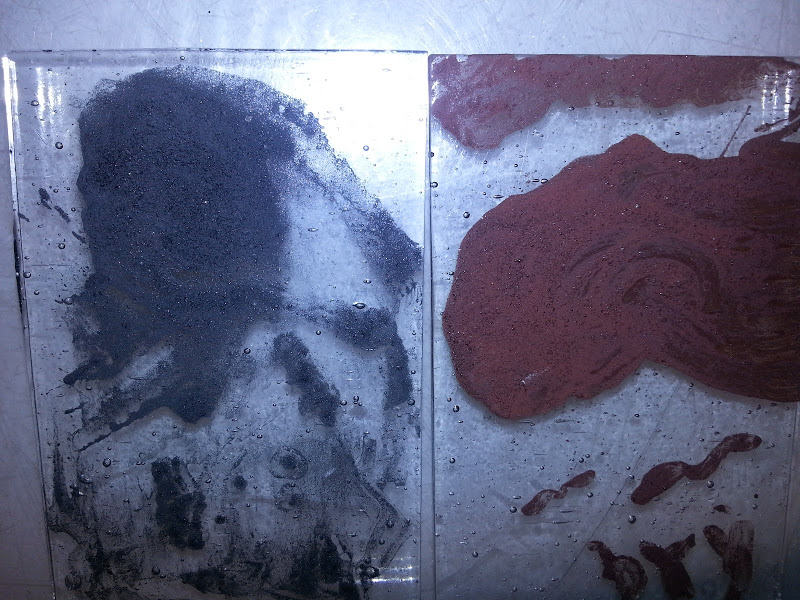
The chips actually worked quite well. They didn't fire to the smooth and glossy shine of my modern Resuche paints, but they were opaque and well-adhered. I suspected, still, that they would be poorly fixed so I took the chips to my lightbox and hit them with a skewer I use for cleanup work. None of it scratched off.

The iron chip is "psychologically black" rather than optically black; When you see it, you know it's black. Your brain would remember it as black. It's actually fairly grey. The copper based pigment is a pretty color, but I would best describe it as somewhat like dried blood; It's lighter than bistre brown (which reminds me of old tree bark, it's a very dark color but not enough to be perceived as black) and it's a bit darker and more true than tracing brown, which to me has a reddish hint.

Overall, it was incredibly exciting to get working results with these very first attempts. I'm going to pursue more period steps immediately.

As an afterthought, I want to document something Master Avery shared on Facebook. I was totally unaware that you can reverse rust back into iron. The physical structure is destroyed, but the iron is recoverable. This is one way to get good, fine, filings; By using an oxidizer (and I will edit in what he offered, bleach I think) you can get the iron to rust. Then you can easily grind the rust. Putting it in charcoal and heating it appropriately will reverse the oxidation and leave iron. Very, very neat.


Lessons Learned/New Questions:
Holy cow, this worked.
It would work better if ground up more finely
     Use commercial powder/better sieved home made powder?
     Try the porphyry method
Does da Pisa have a recipe? Mappae Clavicula? The Bolognese manuscript? Have to check them...
I did very tiny batches, next time use my sandblasting mask to avoid any invisible dust inhalation.
How is color modulated? How is my modern tracing black so much darker? More iron? Or a darker mineral?
What will hematite look like? Pinkish, for sure, but...
What is Byzantine blue glass? A color, or a specific formula of glass? Byzantium is a purple...

Wednesday, April 30, 2014

No more BS about Pb

A bit of an "aside." I've had the unpleasant experience of listening to several heated discussions on Facebook about lead safety. I've had multiple intelligent friends speak to me about concerns about their glasswork and non-glass friends worried about my health and safety.

I am impressionable when it comes to medical matters, so a heated discussion on a wonderful Facebook group for glass artists left me a bit paranoid. At the time I spent a bit of money to build a better ventilation system, researched lead safety extensively, and discussed it with everyone I knew. I had been made to believe, however briefly, that my love of glass was killing all of my loved ones who set foot in my house.

Not happening. Today's post is going to cover some lead safety "Fact or Crap" items.

The big Fact: The significant threat is ingestion, not inhalation.

Think of lead much like water. Is ice contributing to the humidity of your air (are you inhaling it?) Yes, technically. A tiny portion of the ice can sublimate straight into water vapor. But it's so little it's insignificant. Is liquid water sitting in a glass adding to your humidity? Yes, very slowly. If you want to raise the humidity in a room, how do you do it? A pot of boiling water works much better. Lead is little different... actually, MORE difficult than water.

Lead melts at 621.43 (°F). At that point it's equivalent to liquid water (as far as our inhalation of it). Lead doesn't boil until 3180 °F. We are quickly melting it and it cools and resolidifies. You aren't at a risk of inhaling lead fumes unless you are smelting it. If you solder and you see fumes/smoke fly in the air that is not solder, that is flux. Flux is often resin based (check your bottle and your MSDS) and/or a chemical formula that will not poison you. You CAN irritate your sinuses and lungs, and cough for a day or two (at least the brand I use, Old Masters, can't poison me unless I confuse it's blue color for Romulan Ale and take a swig).

Now, as you work on it you get it all over your hands. That's why you must wash your hands immediately after working. You want to get lead poisoning, lick your fingers. I've cast lead into cames now, it didn't generate fumes (and incidentally my stovetop could barely melt the lead).

Some of us paint, and we use lead-based paints. Like a lampworker or glassblower using frit/powder, it is more of a concern. However, the powdered pigment isn't like flour and so on. It's a "heavy" powder, filled with glass fluxes and heavy minerals. While it is a powder, I've noticed minimal "floating dust" when I opened the sealed jar. I take a palette knife's worth and put on a palette with no noticeable cloud. Of course then we promptly mix it with binders and mediums and such and it's never again in dust form. I do own a mask that I can wear if I am concerned (and I use it for my silver stain mixes, which DO like to make dust clouds). Otherwise... as rare as I actually mix a fresh batch of paint... it's not a serious concern for me.

Now, for three "real world" arguments. The owner of the local glass shop, a woman who is as generous with her knowledge as she is skilled at a workbench, discussed lead safety with me a few months ago after a Facebook thread made me panicky and I bought ducting to build a ventilation rig. She informed me that in 30+ years of doing stained glass she has occasionally had a blood lead level test run, and it has never shown anything abnormal.

In the aforementioned FB thread, the owner of a professional studio mentioned she had an employee once who did test for elevated lead. Turned out he hadn't been changing out of his work clothes at work, and had been driving home in them after being around soldering and lead 8 hours a day. THAT lead to an "elevated" level of blood lead! Not lead poisoning.

So, in an effort to maybe put this to bed, both for others and for my own paranoia, I just went to the hardware store three hours ago and bought a big pack of lead tests. Instant Lead Testing ("If it's red, There's lead!" it says. "If it's red, you dead!" I thought) by Lead Check. A pack of plastic tubes with two ampules you crush to mix the solution. You then apply it to surfaces and If It's Red(tm) You're gonna have a bad time, mmkay?

Test 1 - My computer desk. I do my pattern work on my computer and have been known to absentmindedly click print while working on glass. Oh, I also eat here and spend 10-16 hours a day near this desk. You can imagine why it was site number 1. I dumped yellow testing liquid all over the desk, several important keys, and the left button of my mouse. Not a hint of red.

Test 2 - Other common surfaces in my house. After all, as some people keep trying to say to us, lead vapors are floating around to kill us and everyone we love. My couch? Nope. My dining room table? Nope. If you are unfamiliar with my home, it's an open floor plan, no walls. Couch armrest, kitchen counter, all ok.

Test 3 - What the heck, is this thing on? Solder and my (paint-encrusted) palette knife. Both came back brilliant dark red (oddly the solder took several seconds and the palette knife's droplets turned red practically as soon as I thought about applying). I guess they work!

Test 4 - My workbench. I tried the surface of my primary work bench. Yellow!
Test 5 - The plastic top of my lightbox. Tried several spots, all yellow!
Test 6 - The side of a plastic storage thing bordering my solder area. Yellow! This is about 1' from my soldering area.
Test 7 - The wall bordering my solder area. Permanent yellow staining of the paint, a foot from my soldering area.

Test 8 - The steel coil holder for my soldering iron, less than 1" away from the hot tip of the iron when it's on. YELLOW.
Test 9 - Dragging the thing through every cranny and coil above the soldering iron in that holder. FINALLY got some pink.... at the opening of the holder, which I hit every time I put the iron away without looking right at it. I guess that makes sense.


Edit: Test 10 - Tested the ceiling above my soldering area in several spots on a 2' line above the bench. YELLOW.

So, in short: Don't smelt lead from ore, don't lick your fingers, don't confuse your gin and tonic with your flux and wash your hands, kids!

Monday, April 22, 2013

Paint chips

Paint chip samples, to go into the binder. Before firing they always look lifeless and like drawing pastels, in reflected light:


Pre-firing, in transmitted light. I sketched little phrases on them for contrast. The samples are intentionally not blended even:


This was a very beneficial test, in the end, because the transparent green enamel I thought I bought was opaque. That project got sidelined for a bit as I try to decide whether to try it with enamels, or flashed glass. I don't want a leadline where... ah, but that's another post for another day. Three new colors coming this week to test as well.

Wednesday, April 17, 2013

Test Binder

A helpful idea to share quickly. I've begun accumulating test pieces and samples to the point where I can't keep them straight anymore. Enter my test binder:


I took an old binder, and filled it with baseball card sleeves you can get at your local hobby shop or Wal-Mart (try the hobby shop first). Each glass chip goes into a sleeve, with the back of a piece of 3x5 notecard. This gives an even white surface for viewing the samples, and the lined side of the cards has notes on what the sample is. Right now I have a description and, when relevant, firing schedule for each piece recorded.

Monday, April 1, 2013

Painting Practice Pieces


I made a quick practice piece to check my firing schedules and the paints:


For some reason (other than being an SCA herald?) I like to use an Ancient Crown for my practice pieces. I mixed a small batch of Reusche 1059 tracing black, and a matting color of about 50/50 Reusche 1220 A gray green and 1110 bistre brown #7. I did the matte, waited, very roughly traced the ancient crown, waited. I removed the matte from about 2/3 of the crown and did a thin highlight around the entire border. Fired it, applied the silver stain, tried a new blender, and fired. This shot shows some of the matting coming off:


 I'm using Reusche 1384 silver stain, Yellow #3. I had a previously mixed batch. I took a small bit, diluted with lavendar oil, and diluted it too much. Then I kept putzing about with it, and it was too dry when I went to hit it with the blender. Eh, I thought, it's a test piece. Fired it again:


 I am not unhappy with it. The matting is too light, the lines irregular and poorly traced (but it was a test piece), and the silver stain uneven. The only actual problem I've noticed is metalling where my silver stain is thicker. It happened once before, as well:


I checked my firing schedule (I'm using schedules from Williams & Byrne), and I noticed that my current schedule only goes to 1040°. Metallizing, as I understand it, normally happens when you fire too hot. RP 1384/Silver Stain, Yellow #3 has a listed firing range of 1050-1080. I'm going to do two more tests this week, firing to 1020° (20° below my current schedule) and 1060° (20° above) to see what the effects are. Viewed directly on the stain is pretty, this may be something I end up having to live with, because I can't image 30 degrees below the listed range is going to make it better, and going higher should make it worse if this is actually metallizing.

(Update, 4/17/13)

I ended up with interesting results. The test piece fired to 1060°, just inside of the manufacturer's listed range, turned out horrifically bad. I went ahead and fired it on a chip with a blue enamel I have plans for, and this was my result:


Horrible metalizing, "yellow mother-of-pearl" as I expected from Williams & Byrne's books, their description of overfired silver stain. It looks horrible in both reflected and transmitted light.

The chip fired to 1020° was relatively the same as 1040°:


Looking straight through it, its functional, but there are some off spots and in reflected light you can see its still not right. Thirty degrees beneath the listed range, and it's still not right? I started to suspect I was firing for too long, then, because surely it couldn't be too hot...

Checked Elskus, seeing what he had to say on the matter. Silver stain, according to him, has a functional range of 950° to 1050°! I'm still on the high end, according to him. Ok, one more chip, at 1000° then.


This picture doesn't do it justice. Beautiful and quite even. I stared at the chip for several minutes, held it up to various lights, placed it on my lightbox. I put it by my computer and picked it up ever few minutes for an hour, staring. 1000° it is, then, and that temperature has been working great for me. As the masters wrote and write, experiment and experiment some more...